
Learning how to control an airbrush is likely going to be one of the most important parts of learning how to airbrush.
Simply because, If you don’t know how to properly control the airbrush, how are you going to use it to your full advantage?
Nonetheless, given the fact that you are here reading this, clearly your looking to maximize the airbrush to your full advantage!
To which I applaud you!
Anyway, today we will be diving deep in to the best practices for controlling an airbrush. But if you haven’t already, I strongly suggest you learn how to properly hold an airbrush first (If you haven’t done so already), then come back here to learn airbrush control.
So, how do you control an airbrush?
Well, this will depend heavily on the airbrush action type your currently using.
For instance, a single action airbrush will be controlled differently from a double action airbrush. But for the most part operation between the two are similar. The double action airbrush just has one added step involved for operation. Hence the name “Double Action”.
But in simple terms, the following sequence is for a double action airbrush (Which is most commonly used amongst the airbrush community):
- Press Down On Trigger (Air On)
- Pull Back On Trigger (Paint On)
- Push Forward On Trigger (Paint Off)
- Release Trigger (Air Off)
Keep in mind, when operating a double action airbrush. The further you pull back on the trigger the greater amount of paint you’ll get.
We will dive further into detail below, along with operation techniques for the Single Action airbrush.
Controlling A Double Action Airbrush
A double action airbrush works as follows:
You’ll Press down on the trigger for air, and pull back (On the trigger) for paint. The farther you pull the trigger back the more paint you’ll get.
This allows for precise control when it comes to paint delivery. If you need more paint, simply pull the trigger back farther, If you find your getting to much paint and spidering begins to occur, simply don’t pull back on the trigger as far. Simple!

Now, that you understand how to double action airbrush works. Let’s discuss proper control sequence.
Proper Double Action Airbrush Control Sequence
The entire control sequence is 4 simple steps as seen below.
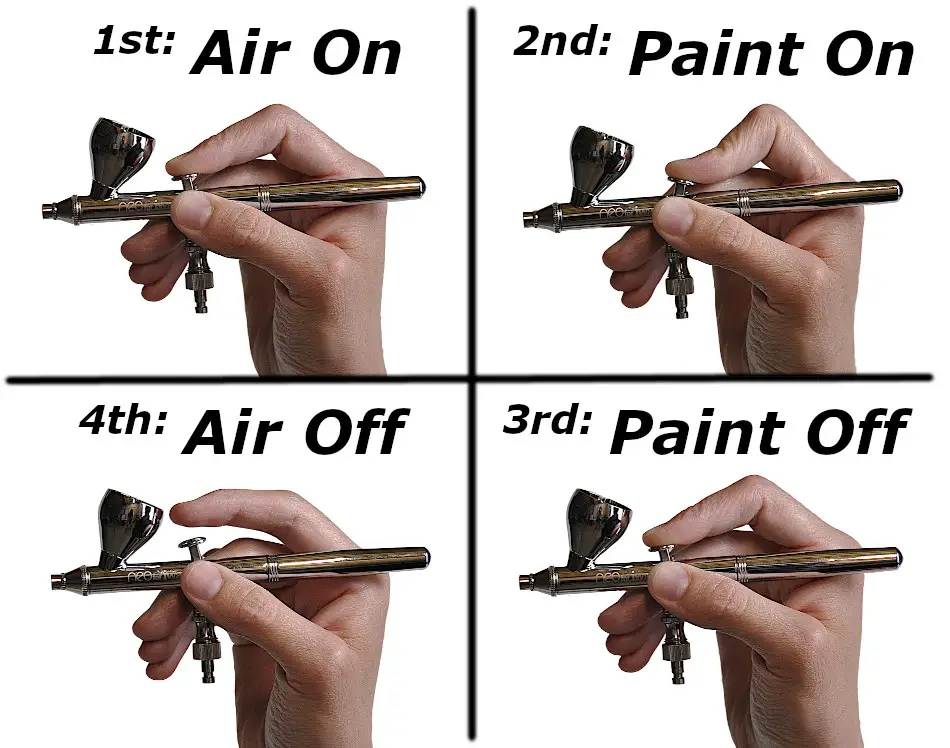
It is important that you begin and end with the air. If you pull back on the trigger (Turning on the paint) before pressing down on the trigger (Turning on the air) you’ll likely end up with an excess of paint on your artwork, and likely be surprised because of it.
As well, the flip side, if you let up on the trigger (Turning off the air) before pushing the trigger forward (Turning off the paint), you’ll end up with a rough finish to your line, as well as, an excess of tip dry.
Tip dry is going to build up more frequently if you don’t stop the paint flow, before stopping the airflow. This happens because the airflow can no longer propel the paint away from the brush, so the paint sticks to the nearest object. That being the tip of your airbrush needle.
Now the Image above demonstrates (in simple terms) the cycle gonn through to operate a double action airbrush. However, most who utilize an airbrush will not follow that exact sequence.
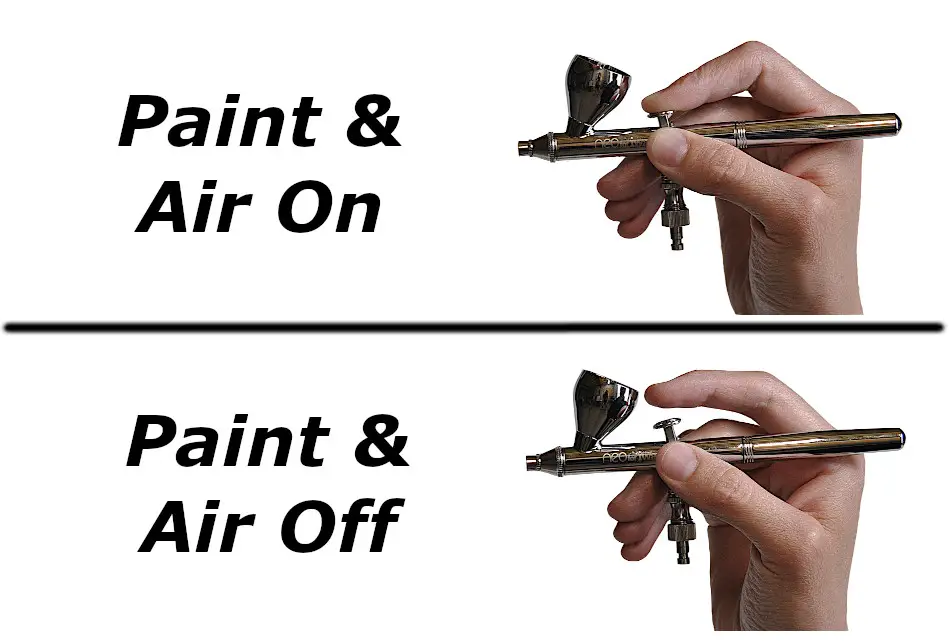
Rather it’s commonly something more along the lines of:

Notice how the air is on the entire time during the sequence…
Keep in mind the “Paint On, Paint Off” portion of the sequence can continue as long as you need / desire. The point is, you must maintain constant airflow when applying brush strokes.
Watch the video below for further explanation:
Note: you don’t have to continuously run the air during your entire airbrush session. Rather it’s only best to continuously run the air while painting sections, when you are focused and painting. If you take a pause simply release the air.
Times when you’ll shut off the air and stop painting include:
- Cleaning off tip dry
- Fixing / Adjusting the airbrush
- Getting more paint
- Thinking about the artwork
- Taking a break
- ….ect
What Not To Do When Operating A Double Action Airbrush!
You don’t want to be bouncing on and off the air a lot (Specifically, between each stroke).
You especially don’t want to be doing so after / before each brush stroke.
Now, bouncing on and off the air won’t do much other the prematurely wear the air valve in the airbrush mechanicaly speaking. But it will heavily limit your ability to control the airbrush.
You don’t want to be pulling back on the trigger for paint before pressing down to turn on the air.
This will result in a paint surprise when you do turn on the air, an likely an excess of paint.
You don’t want to be letting the trigger up (Stopping the air) before pushing the trigger forward (Stopping the paint)
This will result in a rough finish, and excessive tip dry.
Ending with air flow is actually one of my top tips to minimize tip dry.
Note: The double action airbrush design was brought forth to allow greater control of paint delivery to the user. Maintaining constant air flow while painting allows for the start and finish of each stroke to stay consistent with the rest of the stroke.
Controlling A Single Action Airbrush
Now let’s discuss the single action airbrush!
The single action airbrush is very simple to control. However it is a little bit limited in terms of capability, simply because the needle (Which moves back and forth (opening & closing the nozzle) can only be adjusted via a knob (commonly located near the tail of the airbrush.
Simply speaking: the amount of paint delivered is not adjusted via trigger positioning. Rather it is increased or decreased based on positioning of the knob.

Single Action Airbrush Control Sequence
The single action airbrush is simple:
- You press down on the trigger for both (Air and Paint)
- And release the trigger to stop both (Air and Paint)
- Then to adjust paint delivery you simply twist the knob adjustment clockwise or counterclockwise to increase or decrease paint delivery.
Side Note: Yes, I had to use my double action airbrush as a demonstration because at the moment of writing I didn’t have access to a Single action…. I don’t commonly use a single action airbrush.
When you press down on the trigger you get both Air and Paint simultaneously. Which makes the single action airbrush very simple to operate. However, it does lack a level of control commonly desired when painting detailed artwork.
That being the ability to control paint delivery via different positioning of the airbrush trigger.
But that’s not to say the single action airbrush is bad. Rather it excels when it comes to painting for coverage. Such as, when painting miniatures / models. because the single action airbrush allows you to set the amount of paint you want and forget it for portions of the painting process.
Conclusion
Knowing how to control an airbrush is a simple but, vital part of learning to airbrush. Not knowing how to properly control an airbrush will likely become a crutch in your airbrush carrer.
So be sure to take the time to develop proper control habits to begin with.
Anyway, I hope you were able to find some value here! If you have any further questions regarding the airbrush do be sure to take a look around the website. Airbrush Insider is dedicated to helping all in the airbrush community!
This is Colt signing off!
Check Out Some Of My Favorite Airbrush Equipment:
- My Favorite Airbrush To Date!
- The Air Compressor I Currently Use, And Why I’m Never Going Back To A Traditional “Airbrush Compressor”!
- My All Time Favorite Airbrush Paint’s For Ease Of Use & Versatility!
Next Resources:
Learning how to airbrush Dots & Lines of different values (Beginner Airbrush Exercises)