If you have ever wondered the workings behind a single action airbrush, or simply why a specific subset of airbrushes are designated as “Single Action”? You have come to the right place!
Like a majority of different hobbies and activities airbrushes come in a multitude of different options, styles, shapes ,sizes and so forth… In terms of airbrushing, one of the many options available is the single action airbrush.
What Is A Single Action Airbrush
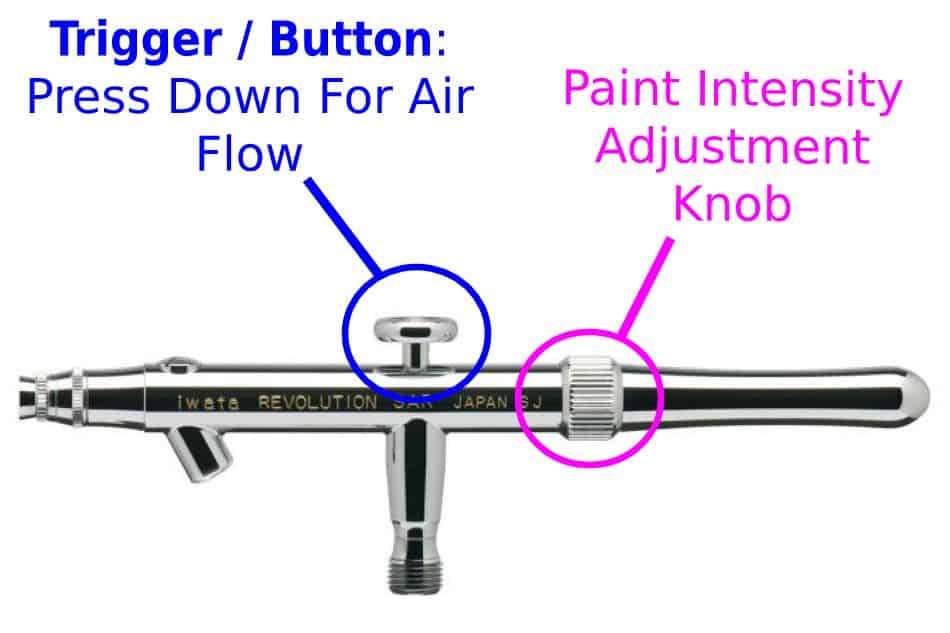
An airbrush that is specified as “Single Action” simply refers to the mechanism controlling the airflow (The Trigger).
For a little comparison to better illustrate the point. A double action airbrush (2 actions to operate) utilizes the 1st action for air flow (Pressing down on the trigger), and the 2nd action for paint flow (Pulling back on the trigger).
Where as the single action airbrush only allows for air flow at the trigger level. The paint flow must be adjusted using the needle adjustment knob located near the tail end of the airbrush
The single action airbrush operates similarly to a spray paint can. If
Correct?
Well a single action airbrush is basically the same. The only difference between a spray paint can, and a single action airbrush is that the airbrush utilizes a needle that can be adjusted in order to achieve precise paint
How A Single Action Airbrush Works
Simply put, A single action airbrush utilizes the button located on top of the airbrush for air delivery, and the needle adjustment knob near the back for paint delivery / adjustment.
The biggest downside to the single action airbrush is that it is limited in terms of “on the fly adjustment” as you paint. It is difficult to achieve patterns such as the “Dagger stroke” due to the inability to control the
Check out the video below for a demonstration, and presentation of different single action airbrushes.
Operating A Single Action Airbrush
Let’s go through the process you would go through, if you were prepping to paint with a single action airbrush… Assuming you already have your
First, you would begin with your needle screwed all the way in (In
At this point, if you were to press the button on top of the airbrush
Second, in order to get paint delivery, you will begin by slowly turning the needle knob (located near the tail of the airbrush)
Soon you will begin to see paint hitting your canvas. At this point you will adjust the paint delivery based on the distance you intend on working from the canvas. Farther away will likely require more paint (Needle adjustment knob turned out), where as Nearer will require less paint
Adjusting A Single Action Airbrush
We already discussed this a little bit but I want to go deeper on the topic. Adjusting a single action airbrush is as easy as twisting the knob (located near the tail of the airbrush) clockwise, or counter clockwise.
But why would you need to adjust it?
Well, the closer you are to the canvas the less paint you are going to require. So, for example, say you have just finished spraying a large area in order to achieve a desired gradient. Now, you would like to get up close to your
If you were to go straight from spraying a large portion of the piece (at a distance) to getting up close and personal with your work in order to bring out detail, without any adjustment of the needle in between, you would likely end up with so much paint concentration that it would pool up and cause what is known as spidering. Click here to learn more about spidering.
The opposite is much more forgiving. Say in this example you were working on the detail portions of your piece (Spraying up close to your work), and soon moving toward shading. Well
If you make the transition without any adjustment of the airbrush it is likely to seem as if paint is no longer coming out of the airbrush. I can
This is when you would turn the needle knob counterclockwise to allow for more paint delivery.
It is this need to adjust the airbrush based on distance from the canvas that keeps many away from the single action airbrush, and keeps the mobs running
Now, that’s not to say the single action airbrush isn’t a good airbrush, as it is for specific tasks. Later we will go over the pro’s and con’s of the single action brush. But if you’d like, Here is a link to my comparison between the single action airbrush, and the double action airbrush.
How To Know If you Are Using A Single Action Airbrush
An easy way to know if your using a single action airbrush is simply by how the needle is controlled. As discussed above, the single action airbrush utilizes a knob near the tail of the brush that adjusts how far in or out the needle is.
Where as a double action airbrush combines both the air control and needle control at the button / trigger. The air control on a double action airbrush is the same as a single action (Press down on the button / trigger). However to get paint delivery from a
Pros & Cons Of The Single Action Airbrush
Even though the single action airbrush is considered to be less capable than its counterpart (The double action airbrush). This
I personally believe that the single action airbrush is ideal for those looking for simplicity and only require an airbrush for the purpose of paint coverage, and some shading. however, those who are looking for excessive design capability I suggest
PROS Of The Single Action Airbrush
| Great For Overall Consistent Coverage |
| Simpler To Use |
| Easier To Clean – less moving parts |
| Cheaper |
For the most part single action airbrushes are much simpler and easier to use. Plus they are quite a bit cheaper than the modern double action airbrushes you see on the market today.
Single action airbrushes are most commonly employed by those who build and paint miniature scale models. However, it’s not very common to see extensive detail done using a single action airbrush.
CONS Of The Single Action Airbrush
| Unable To Change Paint Delivery Mid-Spray |
| Difficult To Perform High Detail |
| Limited Design Capability |
| Older Technology |
Basically speaking, single action airbrushes Are more from the early stages of airbrushing. However, this does not make the single action airbrush not worth considering. The single action airbrush has its part in the airbrush atmosphere, and based on what you intend on painting it may or may
Ideal Uses
under most circumstances the single action airbrush is okay for those who intend on painting using gradients, shadows and similar artistic design. However, it is exceptional at paint coverage, if say, you find yourself needing to
Non Ideal Uses
The single action airbrush can prove to be quite difficult when painting High detailed pieces, with a lot of thin, fading lines. for example, single action airbrushes can prove to be
Conclusion
As stated above, the single action airbrush utilizes the button, most commonly located on the upward side of the airbrush for air delivery (This button represents the single action). For paint delivery it uses a “needle adjustment” knob located near the tail of the airbrush under most circumstances.
The needle adjustment knob basically controls the amount of paint delivery. The farther you have the knob turned in, the less paint will flow. The farther you have the knob turned out, the more paint will flow.
Granted the single action airbrush is looked down upon by the community when compared to the double action airbrush. Simply for the limited control of paint delivery. Though this does not mean it is not a viable option worth consider.
Anyway, I hope you were able to find some value here! If you have any further questions regarding the airbrush do be sure to take a look around the website. Airbrush Insider is dedicated to helping all in the airbrush community!
This is Colt signing off!
Check Out Some Of My Favorite Airbrush Equipment: