Building your own airbrush setup means mastering one essential skill: connecting your airbrush to an air compressor properly. When done right, you’ll enjoy clean, precisely metered air flowing effortlessly—no matter how far your compressor sits from your workspace.
This guide breaks down everything you need to know—from selecting components to assembling your air line—for consistent, professional results. Whether you’re new or upgrading your setup, this step-by-step walkthrough will ensure your airbrush performs at its best.
⚙️ Understanding Airbrush and Compressor Compatibility
Airbrush air compressors and shop air compressors often use different thread standards and fittings depending on make and model, making compatibility with your airbrush a key consideration. Two common fitting standards include:
- 1/8″ BSP (British Standard Pipe): Typically found in European-made compressors and fittings. Threads are tapered, requiring correct matching to avoid leaks.
- 1/4″ NPT (National Pipe Thread): Common in American-made compressors and fittings, also tapered with specific pitch and diameter.
Mistaking one for the other can cause cross-threading or leaks, so verify your equipment specs before purchasing hoses and adapters.
Thread Identification Tips:
- Compare thread diameters with a caliper.
- Inspect thread pitch and angle visually or with a thread gauge.
- Consult manufacturer manuals or websites for specifications.
💡 Pro Tip: Properly matching thread types and sizes prevents leaks, improves durability, and ensures your air system stays airtight for consistent performance.
🧰 Essential Components You’ll Need
Building a reliable air line requires these five components:
| Component | Function & Importance |
|---|---|
| Air Regulator | Adjusts and controls air pressure to optimize spraying conditions. Crucial for paint atomization. |
| Air Hoses | Connects components; choice impacts reach, flexibility, and airflow quality. |
| Air Filter | Removes moisture, oil, and debris that can ruin paint jobs and damage your airbrush. |
| Fittings & Adapters | Connects different parts of the air line with airtight seals; must match thread types and sizes. |
| Assembly Sealant | Prevents air leaks at threaded connections, maintaining pressure and efficiency. |
Each plays a critical role in maintaining clean, consistent airflow essential for precise airbrushing.
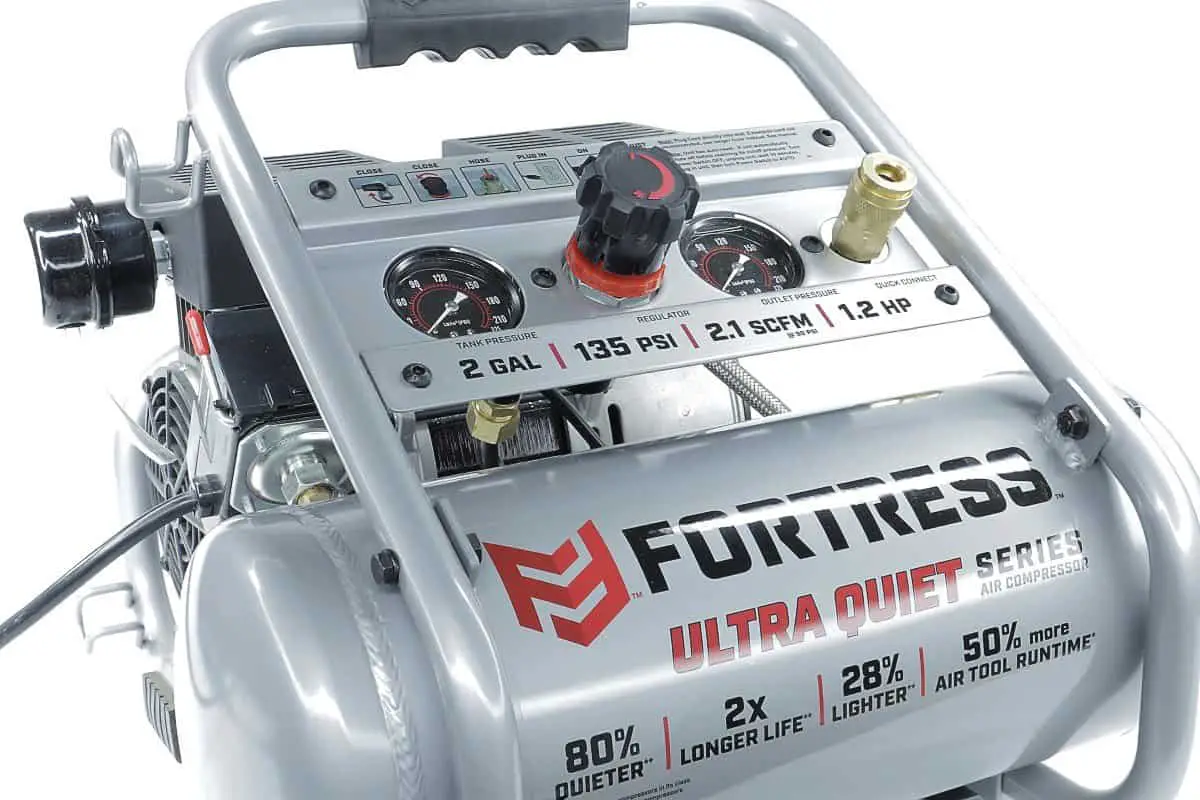
💨 Air Regulator: The Heart of Pressure Control

Pressure regulation is essential because:
- Paint atomization requires a specific pressure range, generally between 15 to 30 PSI, depending on paint type and airbrush model.
- Pressure fluctuations cause inconsistent spray patterns and paint flow.
- Overspray caused by too much pressure wastes paint and creates mess.
- Low pressure results in sputtering and poor paint coverage.
Choosing a regulator:
Look for a regulator with a built-in gauge for real-time pressure monitoring and a fine adjustment knob. Some regulators also integrate moisture traps, enhancing air quality.
💡 Pro Tip: Place the regulator as close to the compressor outlet as possible, ensuring the air entering the system is stable before it reaches hoses and filters.
🧵 Air Hoses: Selecting the Right Ones for Flexibility and Reach

Airbrush Air Hose
Designed for maneuverability, airbrush hoses are lightweight, flexible, and often reinforced to resist kinks and wear. Their fittings are typically 1/8” or 1/4” thread sizes, matching airbrush inputs.
Using an appropriate airbrush hose ensures:
- Smooth, uninterrupted airflow
- Ease of movement for detailed work
- Minimal fatigue from heavy or bulky hoses
Shop Air Hose (Optional)
Adding a heavier-duty shop air hose upstream serves several purposes:
- Noise reduction: Position your compressor farther away, reducing workspace distractions.
- Air cooling: Longer hoses give compressed air time to cool, reducing moisture and improving filter effectiveness.
- Extended reach: Enables larger work areas without moving equipment.
💡 Pro Tip: Make sure the shop hose fittings match your regulator output and air filter input for proper sealing.
🚿 Air Filters: Protect Your Artwork from Contaminants

Moisture and oil are common in compressed air systems and cause serious issues:
- Moisture: Leads to water spots, poor paint adhesion, and blotchy finishes.
- Oil: Deposits on surfaces, contaminating paint and affecting drying.
- Dust and debris: Scratch delicate surfaces or clog airbrush needles.
How filters work:
Filters trap water droplets and oil aerosols via internal mesh or coalescing elements. Some models combine moisture traps with oil filters for comprehensive protection.
Maintenance:
Empty water traps regularly to prevent overflow. Replace filter elements according to manufacturer schedules or when airflow drops.
Placement:
For maximum efficiency, position filters downstream of any long hoses to allow moisture to condense first.
🔩 Fittings, Connectors & Adapters: Securing Your Air Line

Your air line may require various fittings depending on your compressor and airbrush brands:
- Quick-connects: Enable rapid assembly/disassembly, great for changing setups or cleaning.
- Adapters: Convert between different thread sizes or types (e.g., BSP to NPT).
- T-fittings and splitters: Allow connecting multiple airbrushes to one compressor.
Tips:
- Always verify thread type and size before purchasing.
- Use stainless steel or brass fittings for durability.
- Keep a selection of common adapters on hand for flexibility.
🛠️ Assembly Sealants: Prevent Air Leaks and Optimize Performance

Leaks reduce air pressure, forcing compressors to work harder and increasing noise.
Two main sealant types:
- Teflon Tape: Wrap male threads 2-4 times clockwise to ensure tight seals. Avoid overuse to prevent tape shredding into the air line.
- Liquid Thread Sealant: Provides a stronger, longer-lasting seal and is easier to apply evenly. Avoid getting sealant inside hoses or ports.
💡 Pro Tip: Apply sealant only to male threads, and avoid contaminating threads with dirt or oil for best adhesion.
⚙️ Step-by-Step Assembly Process

- Turn off compressor and release residual pressure for safety.
- Attach the air regulator to your compressor outlet, ensuring threads are sealed.
- Connect the shop air hose (optional) to the regulator, wrapping threads with sealant.
- Install the air filter downstream of the shop hose to trap moisture and contaminants.
- Attach the airbrush air hose to the filter outlet for flexibility at the painting end.
- Connect your airbrush to the airbrush hose securely.
- Power on the compressor and adjust the regulator to between 15 and 30 PSI, depending on your paint and airbrush specifications.
- Check all connections for leaks by listening closely or using soapy water to detect bubbles.
🎥 Video Walkthrough
Visual aids make assembly easier and clearer. Include diagrams showing the correct order of components and videos demonstrating step-by-step installation, adjustments, and troubleshooting.
🔧 Troubleshooting & Solutions
- Air leaks? Tighten fittings, reapply sealant, and avoid overtightening to prevent damage.
- Insufficient airflow? Inspect regulator settings and check for clogged filters or hoses.
- Excess moisture? Replace or drain filters more frequently; consider adding a dryer if moisture persists.
- Incorrect fittings? Cross-check thread types carefully, and invest in quality adapters.
Bonus tip: Regularly clean and maintain all components to extend their life and ensure optimal performance.
✅ Conclusion
Connecting your airbrush to an air compressor correctly is the foundation for outstanding airbrush art. Whether you keep your setup simple or add advanced components like filters and multiple hose lengths, the goal remains: clean, steady, adjustable airflow for flawless paint application.
Explore Airbrush Insider for more expert tutorials, gear reviews, and tips designed to help you elevate your airbrushing skills and setup.