Mixing airbrush paint with thinner is something you’ll do often if you spend any time using an airbrush. For this reason, it is important you know the methods to do it quickly and efficiently to reduce down time.
When it comes to thinning out airbrush paint there is a plethora of information on the web discussing thinning ratios, viscosity requirements and so forth.
Even I’ve created my own guide on thinning airbrush paint…
But no one seems to talk about the methods available for mixing the two media together.
I’ll be honest,
There are a multitude of methods you can employ for mixing your airbrush paint with reducer…
But here I will share with you the few I have found to be most efficient and require little cleanup, if any.
Methods For Mixing Paint With Thinner
There are 3 major containers I commonly use for mixing airbrush paint with thinner, or for mixing different colors with one another.
Those inclued:
- In the airbrush paint cup / bottle
- In a small condiment cup (Specific for mixing paint)
- In a spare paint bottle
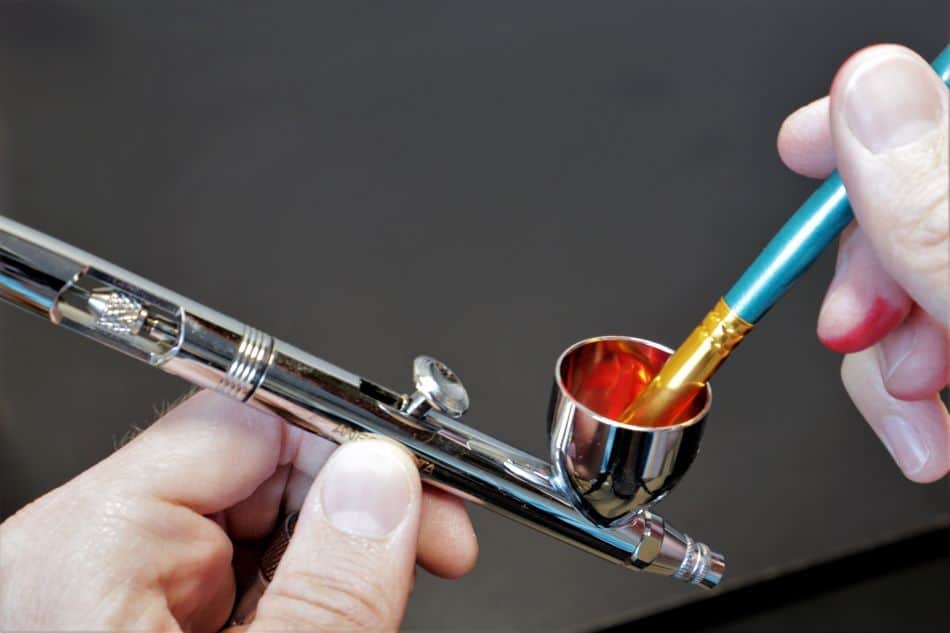
1) Airbrush Paint Cup / Bottle
Whether you’re using a gravity feed airbrush or siphon feed airbrush this method will apply to you.
This method simply utilizes the paint chamber located on or attached to your airbrush. I personally prefer this method as it requires the least amount of clean up and can be done very quickly once you develop a paint system to follow.
Mixing Instructions:
Dump a measured amount of thinner into your airbrush cup, followed by a measured amount of airbrush paint (Most count drops). Using a small paint brush, stir the paint and thinner together till you’ve reached uniform color. Test paint on a scrap part, and you’re ready.
I have found this method can be performed the quickest and requires the smallest amount of cleanup out of all mixing methods listed on this page. Hence why this method for mixing airbrush paint with reducer comes out to be my favorite.
Step By Step:
- Dump a measured amount of thinner into your airbrush cup / bottle.
- Dump a measured amount of paint into your airbrush cup / bottle.
- Stir or shake the mixture till thoroughly mixed, backflushing occasionally if needed.
- Test spray on a spare part, and you’re ready to go.
I personally use a small paint brush to stir the thinner into the paint, then will drop the paint brush into a cup full of water to clean the brush.
But some will place the lid on their airbrush and shake the mixture together. I prefer the alternative simply because it can get messy using a gravity feed airbrush. But siphon feed users, this may be a better option.
Plus, this method is easy to adjust paint viscosity either way, thinner or thicker, as all you’ve got to do is add paint (to go thicker) or add reducer (to go thinner) and repeat the above steps to mix it.
2) Small Condiment Cup (Specific for paint use)
Using a small condiment cup for mixing paint with thinner is another viable option. Especially if you weigh out your paint for exact mix ratios. This method can also prove to be better for getting a complete mix between the two.
Though the downside to this method includes more clean up required, and greater waste. I find a lot of paint gets left behind in the mixing cup when poured into the airbrush.
These are the condiment cups I use for paint reduction when I utilize this method. Available on Amazon at a decent price.
Mixing Instructions:
Dump a measured amount of airbrush thinner into a small condiment cup, followed by a measured amount of airbrush paint. Using a small paint brush or stir stick, stir the paint and thinner together till you’ve reached uniform color. Dump thinned paint into airbrush paint cup, and you’re ready.
I find this method to be difficult to test & ensure your viscosity is right for airbrush application. Simply because the paint is already in the airbrush, so you may find yourself utilizing the above mixing method for adjusting paint viscosity on the fly.
Step By Step:
- Dump a measured amount of airbrush thinner into a small condiment cup.
- Dump a measured amount of airbrush paint into the thinner filled condiment cup.
- Stir mixture together till you’ve reached uniform color.
- Pour thinned paint into airbrush paint cup / bottle
- Clean condiment cup for later use, and you’re ready to spray.
Using this method, I find it best to stir the mixture using a small paint brush, as the bristles do a better job at agitating the mixture then a pop sickly stick or similar instrument would.
3) Spare Paint Bottle
Given the shelf life of airbrush paint is significantly reduced once you add reducer to it. Most refrain from mixing their paint with thinner until the moment they are going to use it.
This is why, you’ll see so many airbrushes artist thin out their paint on the spot, rather than having it pre-thinned.
However, if you’ve got a big project, you’re working on that will require greater then 1 oz of paint. You can save a lot of time by pre-thinning a large quantity of paint beforehand in a spare paint bottle, such as these (Available on Amazon). Just refrain from using this pre-thinned paint after a week or so of the date it was diluted with thinner.
Mixing Instructions:
Dump a measured amount of airbrush thinner into a spare paint bottle, followed by a measured amount of airbrush paint. Put the lid on and shake the mixture or stir using a paint brush or stir stick, stir the paint and thinner together till you’ve reached uniform color. Dump thinned paint into airbrush paint cup when needed, and you’re ready.
Save some space at the top of the paint bottle for adjusting the paint viscosity if needed. I can’t tell you how many times I’ve thinned my paint into a spare paint bottle and over filled it before getting the amount of reducer in it I desired…
Step By Step:
- Dump a measured amount of airbrush thinner into a spare paint bottle.
- Dump a measured amount of airbrush paint into the thinner filled paint bottle.
- Put the lid on and shake the mixture or stir using a small paint brush or alt instrument.
- Pour into the airbrush, and you’re ready to go.
This is a great option for getting the paint exactly as you want it before a large project. Whether you’re just trying to get the perfect consistency or mixing up the perfect color, maybe both. This is a great option.
Plus, this works great for keeping the paint fresh, as it’s in a sealed container, rather than having a significant amount of paint sitting in your airbrush paint cup exposed to the air.
Just pay attention to how long you use it for, as the shelf life of airbrush paint drops significantly when reducer is added to it (Depending on the product).
Mixing Rules
Follow these guidelines and it will make mixing up your airbrush paint with thinner a far smoother and more efficient process, and I can guarantee you will save time and reducer errors.
Thinner First
It is important that you put the thinner in first when using a gravity feed, or siphon feed airbrush. If you were to place the paint in first, it would stick to deepest point in the cup and be more difficult then is necessary to mix with the thinner.
Given the paint is heavier and will be further more difficult to mix.
This will make mixing the two media far easier. Simply because, by adding the paint to the mix after the reducer, the paint will float in the reducer making it far easier to mix the two media together.
Otherwise,
If the paint is added first, it tends to stick to anything it contacts, as it doesn’t have the thinner acting as a barrier between the paint and cup walls.
Test Spray
No matter the method you use for mixing your paint with thinner.
Always test spray the paint on a scrap part, or on a piece of paper… This will eliminate the possibility of spraying airbrush cleaner, water, or even straight thinner onto your artwork.
I can’t tell you how many times the initial spray (after putting paint in my airbrush), has been straight thinner, or cleaner for a moment. The the paint starts coming through.
By simply blipping the trigger all the way back for a split second on scrap material you will clear out any residual liquids that would otherwise damage your artwork.
Cleanup
Always clean up your equipment, containers and tools once finished using them. The largest wasted cost both in time and money, is laziness when it comes to cleanup.
It’s far more difficult to clean up dried paint then it is wet paint. That being said, some paint products do not clean up easily or at all…
So, take the moment to clean it while its wet, rather than risk harming your equipment and having to replace it.
I hope you were able to find some value here! If you have any further questions regarding the airbrush do be sure to take a look around the website. Airbrush Insider is dedicated to helping all in the airbrush community!
This is Colt signing off!
Check Out Some Of My Favorite Airbrush Equipment:
- My Favorite Airbrush To Date!
- The Air Compressor I Currently Use, And Why I’m Never Going Back To A Traditional “Airbrush Compressor”!
- My All Time Favorite Airbrush Paint’s For Ease Of Use & Versatility!
Next Recommended Resources:
- How to practice airbrushing (Exercises to get good)