Let’s discuss how to properly connect your airbrush to any home, or shop air compressor. Odds are, you have found connecting an airbrush to a compressor is not as easy as “1,2,3”. That is unless you purchased an airbrush kit that includes both the airbrush and compressor, along with all the hoses, fittings, and so forth…
Important Update!
This guide has been updated & revised to better answer your questions & help you further understand the components and steps involved in connecting your airbrush to any air compressor. Click below to see the updated guide!
How To Connect Your Airbrush To Any Air Compressor – Updated
However if you did, and you require assistance in the setup process? My suggestion would be to simply go over the instructional guide provided with your kit. Odds are they will walk you through the exact steps necessary to setup, and link everything together. That is assuming the instructions provided are of good value…
If you found the instructions to be of little help then read on, you might just pick up the info you’ve been looking for!
Nonetheless, this guide is rather going to be focused to those who are looking to connect their airbrush to there larger, shop compressor. As the task of doing so can be much more involved, then that of connecting an airbrush to an “airbrush specific” air compressor, as those compressors commonly come set up with everything needed.
But before we get started I want to tell you alittle about me.
My Story:
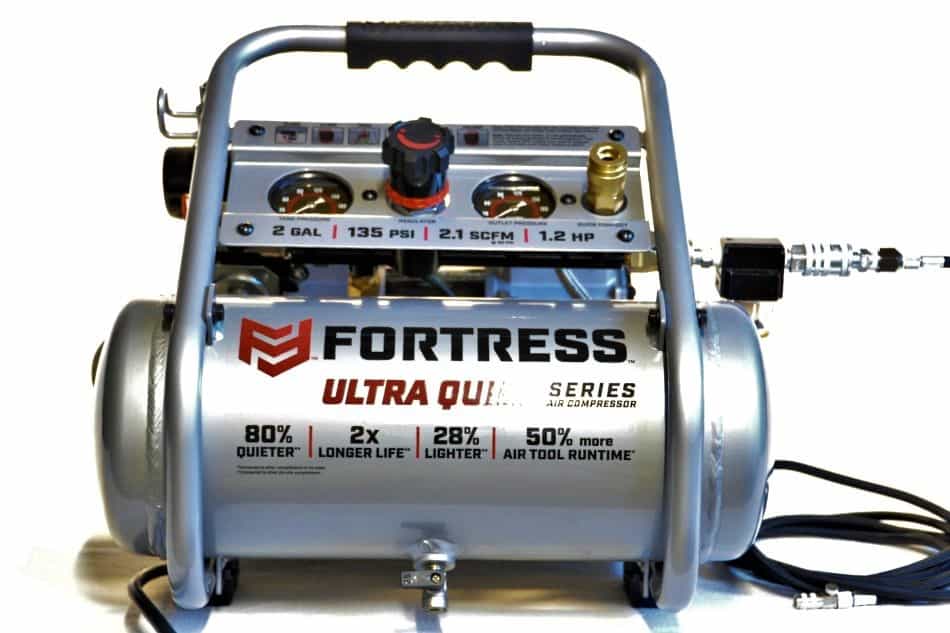
I want to state, I had recently upgraded my airbrush compressor setup to what I believe will be a solid setup for years to come (Learn more about the compressor I went with this time around Here).
I didn’t exactly go with an “Airbrush” specific compressor, so it took a little trial and error along with some research to figure out how to piece together my air line… But looking back it wasn’t difficult by any means.
Anyway, My goal here is to make your setup process much easier & quicker then mine was.
Because of my recent experience with the process I figure it could be very beneficial to those who are going through the process of setting up their shop compressor to work with their airbrush! As I opted for a shop compressor this time around.
So, without further adieu. Let’s get started!
It’s all about the fittings and connectors! Well, at least for the most part. You see, the biggest Issue I ran into when trying to connect my airbrush to the new compressor I got, is that the fittings / connectors weren’t sized right… This meant, I needed to get adapters and/or different fittings & couplers in order to achieve the task at hand.
This made the process difficult and time consuming. As I found myself slowly building out the air line as my understanding of the process began to improve.
Granted, its not just fittings & couplers you will need. You’ll also need a pressure regulator, and moisture trap but other then that its basically all about hose length, and compressor placement.
Lets dive deeper!
How To Connect An Airbrush To A Large Shop Compressor
Though there is going to be more involved when it comes to connecting an airbrush to a shop air compressor, it can pay off big time in terms of usability. As shop compressors commonly have large air storage tanks to which makes for a plethora of advantages when running an airbrush!
But the advantages of a shop compressor is a discussion for another time. Read This article for a few of the advantages of using a shop compressor when airbrushing versus an “Airbrush” specific compressor…
Before we dive into the steps necessary when piecing together an airbrush air line it’s important that you have all the needed tools, and Items necessary. But this list will vary from compressor to compressor & shop to shop.
Simply because one user may only need, say, a 25 foot air hose to get air where they need it, where as someone else may need, say, a 50 foot air hose… It all just depends on the layout of your shop. Specifically, the placement of your compressor versus the placement of your work space. You’ll need the proper hose length to fill the gap.
Unless you are able to relocate your compressor closer to your workspace, or vice versa.
Now, lets go over some of the necessary Items to have when connecting your airbrush to your shop compressor.
Necessary Items For The Job
Below is a list of everything you’ll need in order to connect an airbrush to any large compressor, along with a few optional items I think you may like to have.
The items below are items I personally use, or items I would be using if I didn’t already have similar components laying around prior to building out my airbrush air line. But each of these items can be found on Amazon.com (I will provide links).
- Pressure Regulator (If your compressor hasn’t got one)
- Couplers & Plugs
- Shop Air Hose (Optional)
- Moisture Trap (If your compressor hasn’t got one)
- Airbrush Air Hose
- Airbrush Quick Connect (Optional)
I have structured each of the items out into the orientation that is ideal going from the air compressor to the airbrush.
Lets dive straight in with greater detail.
1st: Pressure Regulator
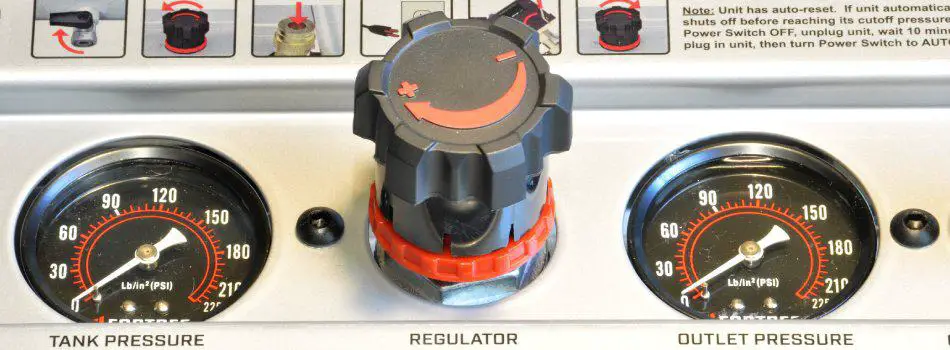
A pressure regulator is likely one of the most important items to have when it comes to using an airbrush. This is because the airbrush commonly requires a specific air pressure range in order to operate correctly.
I do understand that the majority of air compressors out there come equipped with a regulator, and if yours does, then perfect, your in the right spot. However, I do know that pressure regulators are prone to break over time.
If yours is broken, then obviously you’re going to have to get a new one.
Operating an airbrush without the ability to regulate the air pressure will be very difficult, especially when trying to airbrush fine detail.
Pressure Regulator Placement:
First of all, it is typically best to place your air pressure regulator before the moisture trap.
But me personally, if I didn’t have a pressure regulator built into my compressor (that’s working) then I would place my pressure regulator at the start of the air line, or in the center of the air line (between the shop air hose and the airbrush air hose).
Placing the regulator in the center of the air line would make access to the pressure regulator much easier especially if your compressor is located quite some distance away from where you’ll be airbrushing.
However, do keep in mind, by placing the pressure regulator down the air line away from the air compressor you will be putting greater amounts of stress on the air line up until the regulator due to the extensive amount of pressure in the air line. This means you will need to buy a quality (shop) air hose that can handle high air pressure over an extensive period of time.
That is assuming you don’t already have one.
The second place you can put your pressure regulator is just after the air compressor and before the (shop) air hose. This will likely put less stress on your air line, due to the lower psi that will be flowing through it.
Note: If you haven’t got a working regulator, as well as a moisture trap (Will be discussed shortly) then you could opt for a pressure regulator with a built in moisture trap (Which can be found here on amazon). To which will likely be the best option in my opinion if your gonna need both.
If you choose to go this direction Place the regulator / moisture trap hybrid, in the location where the diagram down this page says to place the moisture trap.
2nd: Couplers & Plugs
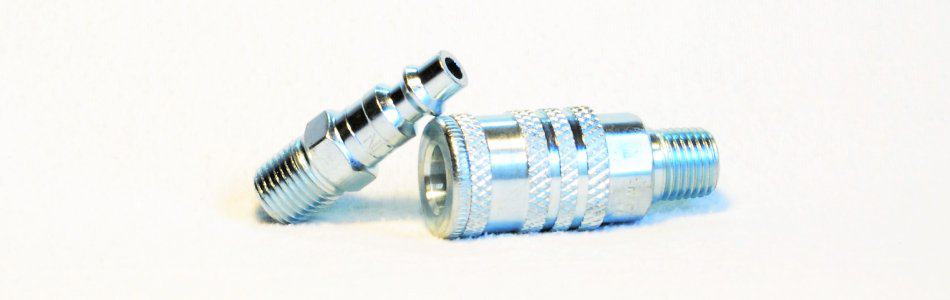
Likely the most asked about part in regards to connecting an airbrush to an air compressor are the connections that are required in order to do so. Well, under most circumstances the common air compressor connectors and couplers will do just fine throughout the majority of the air line.
The only point in the entire air line that will typically require an uncommon connector (One that is not commonly used with a shop compressor) is when it comes time to connect the “Airbrush” Air hose onto the end of the air line.
But the cool thing is, is that, a majority of the different airbrush hose is available will come with an adapter that will easily thread on to your common (shop) air hose connector. The airline layout that I am currently utilizing requires 3 couplers and 3 plugs. So a total of six adapters will be required (Or 3 plug / coupler pairs) if you choose to go with my same layout as described in the diagram below.
However, depending on your requirements you may need more or less, it all just depends upon the setup to which you are trying to build, and the distance you need to fill between your compressor and your airbrush work space.
3rd: Shop Air Hose (Optional)
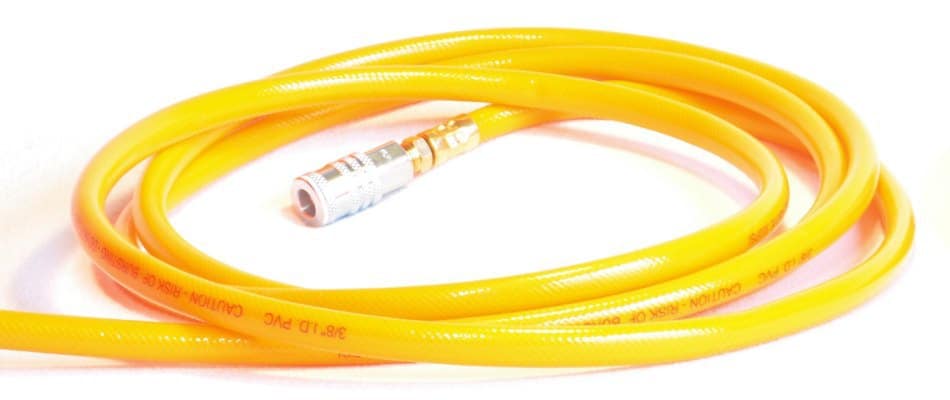
Next in line of this air line build out will likely be a “Shop Air Hose”. But keep in mind this is an optional part of the line, as it will depend on the placement of your compressor, and the placement of your workspace.
If your compressor is located some distance away from the space you intend to airbrush in. Then odds are you’ll need a shop air hose to fill the gap.
The compressor I personally use is small enough I can move it around where I need it, without it being to much of a hassle. So most of the time I remove the Shop Air Hose from my air line. However, the compressor does make noise, and sometimes I’d prefer to eliminate the noise…
So when I don’t want to listen to it, I’ll put the compressor in a different room, and hook up the air line using the shop air hose to fill the gap.
But your situation, may be different. If for any reason your unable to locate your compressor close to your workspace, odds are you’ll need a shop air hose to fill the gap. Simply because the majority of Airbrush specific air hoses are not long enough to fill the gap and leave enough slack to give you free mobility with your airbrush. Most airbrush air hoses are between 5 – 10 feet in length.
Moisture Trap
Moisture in the air line can be a big issue, especially if you are trying to airbrush on something of high value…
Known commonly as a moisture trap, or oil trap. The moisture trap is necessary when airbrushing (no matter the type of compressor you’re using) as moisture is most likely going to build up inside the air tank/s and air lines.
This is due to the air heating up as it is pressurized when traveling through the compressor motor (Where friction heat buildup is un-avoidable), then the air cools back down as it settles in the compressor storage tank/s and air line.
This rapid change in air temp will create small water droplets. And over time as this process happens over and over again, those small moisture droplets will begin to build up, and soon make their way down the air line, and out the tip of your airbrush. Then contaminating your paint, and creating havoc on your work.
Simply put, if your going to be doing any airbrush work. Then you’ll need a moisture trap to filter contaminants out of the air before it reaches your airbrush.
However, there are a few options you have when it comes to moisture traps.
Types Of Moisture Traps:
There are 2 common styles of moisture traps used for airbrush work. They are as follows:
- Those that are placed within the air line build out, And those that are mounted just under the airbrush.
Check Images Below For Better Illustration:


Whichever style of moisture trap you choose is totally up to you both are proficient. I personally use a perpendicular style that is mounted within the air line (As seen in the right photo). However I have heard the smaller option that mounts directly to the airbrush (As seen in the left photo) provides somewhat of a handle, which makes holding the airbrush easier…
Where To Put The Moisture Trap:
Really the in Air-line moisture trap (As seen above in the right photo) can be placed anywhere within the air line you’d like. However, It’s best to place it nearer to the end of the air line (where the airbrush will hook up), rather then the opposite (where the air line will connect to the compressor).
As the farther away from the compressor you place the trap, the more time the warm air will have to cool, and condense. Which will make the moisture trap operate better.
But the closer you place it to the compressor the greater the likely hood the warm air wont have enough time to cool, and will potentially condense after the trap. Pretty much eliminating the benefit of using a moisture trap.
But keep in mind this is a drastic example. As long as your compressor isn’t producing an excessive amount of heat, this really shouldn’t be an issue, even if you place the moisture trap right at the start of the air line (At the compressor).
Now on the other hand,
The smaller moisture trap (As seen above in the photo on the left) is commonly placed just before the airbrush. The great part about using this option of trap is that It not only doubles as a handle as you airbrush, but it also is commonly a cheaper option and easier to keep tabs on.
You see, over time moisture will build up in the trap. To which needs to be drained. By simply having the
If you were to let the moisture trap fill completely with water & gunk. It will cease to do its job, by allowing moisture & gunk to make its way through the line and onto your work.
4th: Airbrush Air Hose
Your nearing the end of the air line build out. At this point you’ll be connecting the airbrush air hose which will then lead up to the airbrush.
Now, If you don’t know, an airbrush air hose is much different then that of a shop air hose. As an airbrush air hose is manufactured specifically to be used with an airbrush. It is much smaller then a shop air hose, and is designed to connect to the thread size commonly found on an airbrush.
Note: common airbrush thread size is 1/8″. However, depending on the brand of airbrush your using it may be a different size.
I have a secret to share though when it comes to selecting an airbrush air hose…
If you choose the right one, it will come with a 1/4″ fitting that will allow you to easily connect it to any common plug (As discussed above under “Couplers & Plugs”), but it will also connect directly onto any shop air hose as well…
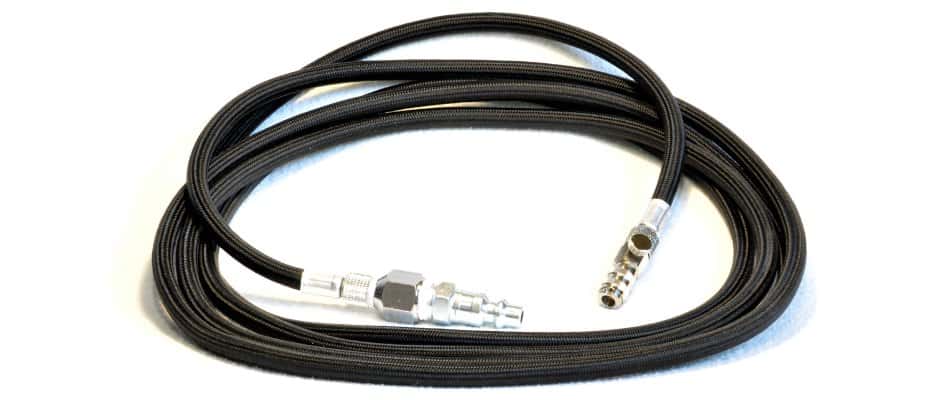
The specific airbrush air hose I use is listed Here on amazon, and it comes with a 1/4″ fitting that makes hooking it up to the rest of your air line a breeze. However, for some strange reason the one that came to me was black? But I didn’t mind, I prefer black.
But do make sure the size will work for your needs.
5th: Airbrush Quick Connect (Optional)
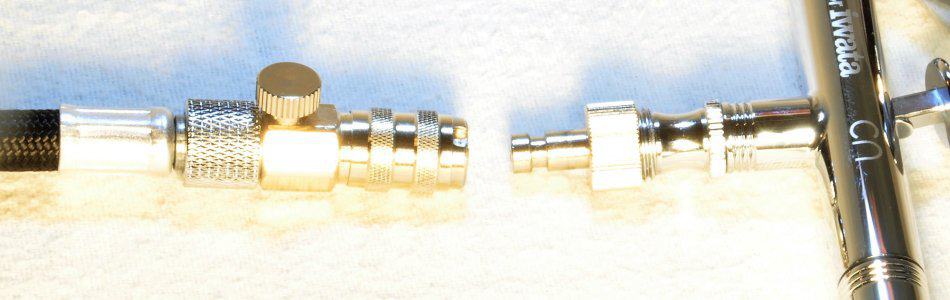
Now you don’t necessarily need a quick disconnect for connecting your airbrush to your airbrush air hose. However, it makes it so easy to connect and disconnect the airbrush from the air line that its so worth it to get.
It simple, the female end of the quick disconnect will thread on to the airbrush air hose, and the male end will thread onto the airbrush its self. Then its as easy as connecting similar to how a common shop compressor plug & coupler would connect and disconnect.
Plus some of the airbrush quick disconnect options come with a MAC valve for quick and easy adjustment of the air pressure without having to go over to the compressor to adjust the regulator.
The Quick disconnect I personally use Is listed Here on amazon, and it comes with a MAC valve for easy air pressure adjustment.
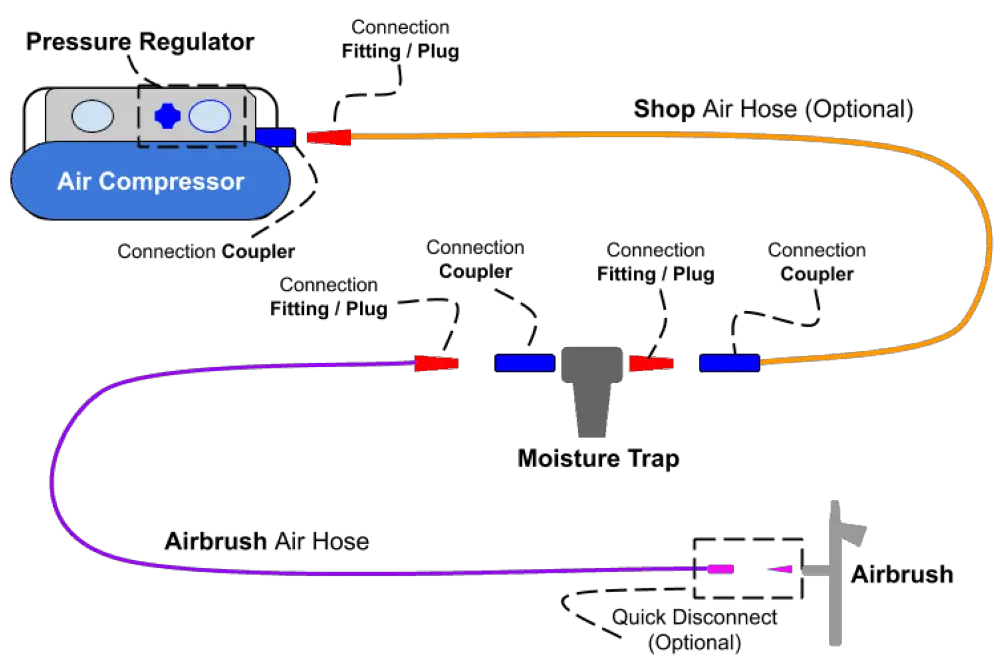
The Layout I Personally Use
Below is a diagram of the layout I personally use to connect my airbrush to my compressor. Keep in mind the air compressor I’m now using is not specifically an airbrush compressor. Rather it has the components of most shop / regular compressors. And lacks the components needed to run an airbrush.
However with some simple connectors, and a few added items it was quite easy to piece the air line together.
Connection Steps & Orientation
Conclusion
The process of connecting an airbrush to any regular compressor can seam alittle overwhelming, especially if you don’t know what you’ll need in order to do so. But looking back after completing my airbrush air line layout. I had learned a lot, so I thought I’d put together this guide for you.
Anyway, I hope you were able to find some value here! If you have any further questions regarding the airbrush do be sure to take a look around the website. Airbrush Insider is dedicated to helping all in the airbrush community!
This is Colt signing off!
Check Out Some Of My Favorite Airbrush Equipment: