If your in the market for an airbrush (maybe even your first?) then odds are you have heard the term “Double Action Airbrush” or “Dual Action” spoken somewhere. Whether it be in a video you watched, or article you read.
Either way, the term has likely made you curious as to what exactly a double action airbrush is. Or possible, how it works???
Well, that is what we will be answering today. But I don’t want to only tell you what it is, and how it works. I’d rather provide you with a complete understanding as to what a double action airbrush is, the desired uses for it, the options available in “Double Action” and so forth.
Consider this your guide on the double action airbrush, and all that it stands for!
So, What is a double action airbrush?
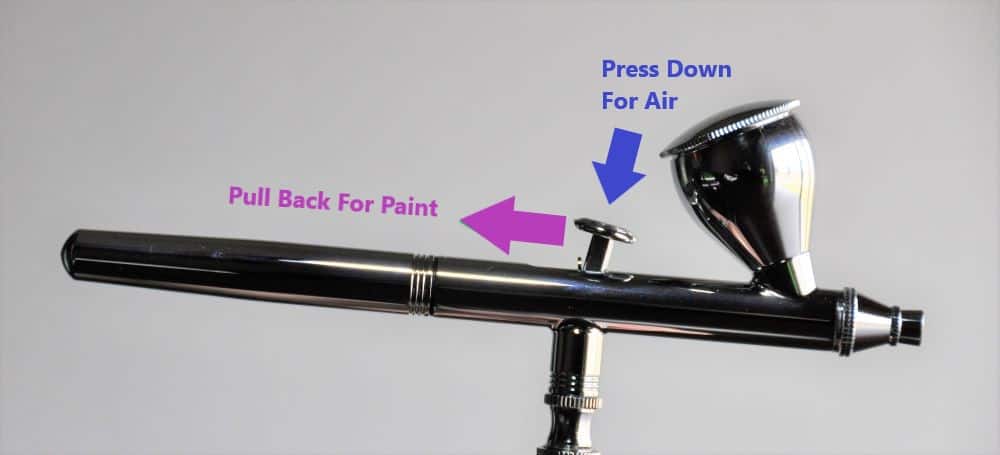
Simply put, The term “double action” refers to the mechanism that controls both the air and paint flow from the airbrush, known as the trigger. Double Action essentially allows you to control the amount of paint flow using the slightest movements of the trigger. This allows for
How The Double Action Airbrush Works

The double action airbrush works by pressing down on the trigger to get air flow, then simultaneously pulling back on the trigger to get paint flow. The further back you pull the trigger, the more paint you
This allows you to vary the paint based on the distance you are from the canvas, and the amount of paint you desire.
How To Operate A Double Action Airbrush
Now lets go over some of the instructions so to say, as to how to work a double action airbrush.
The double action airbrush is quite simple (Once you’ve had some practice).
However it’s important to note:
When using a double action airbrush, many think that since they have control over the paint output (Using the trigger), that they should also be controlling the airflow using the trigger as well by varying the amount of downward pressure they put on the trigger.
But this simply becomes difficult to do for most, and frankly speaking,
For simplicity’s sake I suggest you follow the following steps when operating a double action airbrush. And leave the air control to your pressure regulator.
Steps For Operating A Double Action Airbrush
Assuming you already have your airbrush hooked up to the air hose, with paint already in the cup, and a fresh canvas waiting to be painted.
First: Press Down For Air
Begin by pressing completely down on the trigger, but resist the urge to pull back. At this point you will only be getting air flow.
Second: Pull Back For Paint
Begin to gradually pull back on the trigger, while maintaining downward force on the trigger (To maintain airflow). You will begin to see paint hitting your canvas. Practice pulling back on the trigger to varying degrees to see how the paint output changes based on the trigger position. A properly working airbrush will disperse more paint the farther back the trigger is pulled.
Also, try changing up the distance you are from the canvas. What you will find is: The closer you are to the canvas, the less paint output you need (The less you have to pull back on the trigger). And the further away you are, the more paint you will need (Farther you have to pull back on the trigger) in order to get paint coverage.
Quite simple, Right?
Well, now we need to discuss proper spray technique. You may find yourself naturally wanting to let off the air every time you finish spraying a
But this is bad technique. Proper technique is as follows:
- Air On
- Paint On
- Paint Off
- Air Off
Let me explain, you want to press down for airflow with the airbrush aimed in the direction of a scrap canvas. While maintaining a consistent flow of air, move over to the object you intend on painting and begin to paint (by pulling back on the trigger) and letting retract
You see, if you find yourself using the airbrush similarly to how you would a spray paint can, then you could end up with more “Dry Tip” (Read This post For Further Details About Dry Tip) then necessary. And you are likely to end up with a random paint splotch the next time you turn on the air.
This occurs because the airbrush didn’t have enough flowing air to clean off the tip of the needle, which results in an excessive amount of paint on the
Adjusting A Double Action Airbrush
The thing about the double action airbrush, is, there isn’t much adjustment that needs to be done. You see, all the adjustment in terms of paint flow is controlled based upon how far back you pull the trigger. Granted higher end models may have options on the brush that can be adjusted, but for the most part it may not be necessary.
Now, airflow on the other hand should be adjusted based on your distance from the piece your working on, and the viscosity of the paint your using. But airflow adjustment is done at the pressure regulator rather than on the airbrush itself.
The differences in adjustment is actually what separates the Double action airbrush from the Single action. The single action airbrush requires you to adjust the positioning of the needle using a knob (typically) located at the tail end of the brush. Where as the double action airbrush adjusts the
Pro’s & Con’s
Like the majority of items people have in life. The double action airbrush has both
Pro’s Of The Double Action Airbrush
| Versatile |
| Achieve Finer Detail |
| Limitless |
| Makes It Possible To Achieve specific patterns |
| More Advanced Technology |
| Better Control |
Con’s Of The Double Action Airbrush
| Harder To Master – But worth practicing |
| More Moving Parts |
| Greater Cost – than single action (In general) |
Double Action Airbrush (Uses)
Truly, the double action airbrush can be used for virtually any airbrush endeavor. However, when it comes to specific tasks / jobs. A single action airbrush may make the process easier.
Desirable Uses For The Double Action Airbrush
- Portraits
- Fine detail work
- Shading / Gradients
- Complex design
Un-Desirable Uses For The Double Action Airbrush
- Overall flat coverage
The double action airbrush makes complexity in design and detail possible to achieve in a moderate amount of time. Where as, overall coverage (such as, what you would do with a paint sprayer, when painting an entire car) is easier to achieve with say a single action airbrush.
Simply because you can basically set your desired paint output with little to
Why Double Action Is Preferred Over Single Action.
Most in the airbrush industry prefer the double action airbrush over the single action. Simply because the double action allows for much more versatility in terms of detail that can be achieved. (For a complete breakdown as to What a Single Action Airbrush is, be sure to check out my latest post on the topic!)
Plus the double action provides the user with better overall control of the paint flow instantaneously.
Granted the double action airbrush is harder to master, but it is worth considering. Simply for the fact that it will allow you to, say, “keep your
If you are a beginner who is looking for an airbrush, I strongly recommend you start with a double action airbrush. That is, If you intend on getting into detail work.
If your a model artist, and you simply will be using the airbrush for strictly paint coverage, with a little shadowing, here and there. Then a single action
Basically speaking, the single action airbrush has limited capability when compared to the double action airbrush. But that doesn’t mean you need the added capability of the double action if you will never need it.
For a recommendation on which Double Action Airbrush to start with, I strongly recommend you check out my “Beginner Airbrush recommendation”. I only recommend products I actually use, and are worth getting. That being said I believe I have found the best beginner airbrush!
Conclusion
In final, The double action airbrush gets its name due to the 2 actions of the trigger that allow the user better control over paint output. The first action is pressing down on the trigger to get air flow. The second action is pulling back on the trigger to get paint flow.
When the user pulls back on the trigger, the needle inside the airbrush is
The double action airbrush isn’t perfect. However, it is considered to be the best option in the airbrush industry for most at the time of writing. This is because it allows the user so much versatility when compared to the other options out there.
Anyway, I hope you were able to find some value here! If you have any further questions regarding the airbrush do be sure to take a look around the website. Airbrush Insider is dedicated to helping all in the airbrush community!
This is Colt signing off!
Check Out Some Of My Favorite Airbrush Equipment:

