The debate between the single action and double action airbrush has been around since the dawn of time. Many want to know which is best. But for the most part both are great options depending on the task at hand.
Today I want to discuss the major differences between the two options, as well as the major commonalities. As the functionality between the two are quite similar.
So, what are the differences between the single action and double action airbrush?
Well, the major difference is simply in how the paint delivery is controlled.
The single action airbrush utilizes an adjustment knob, to which adjusts the needle positioning, and in turn, controls the paint delivery. While the double action utilizes a backward motion of the trigger, to which controls the needle positioning, in turn, the paint delivery.
However, the airflow is commonly controlled the same between the two. That being by pressing down on the trigger.
But before we dive into detail on the differences. Lets begin by discussing exactly what a Double action, and Single action airbrush is, and why they are labeled as such.
The Single Action Airbrush

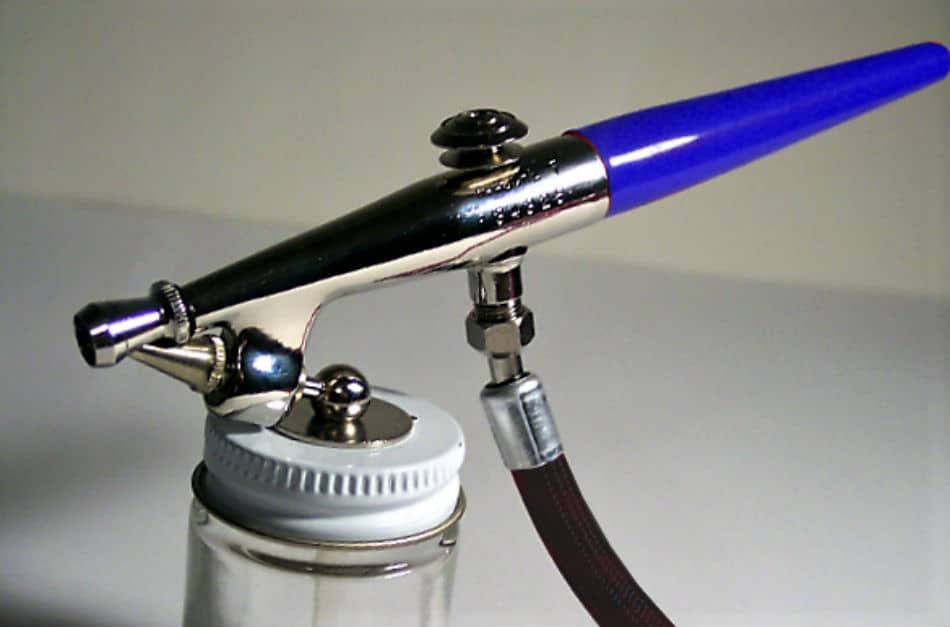
The single action airbrush is just that. It is operated using one “single” action. The action portion of the term is specific to the mechanism that controls the airbrush (the trigger).
The single action airbrush operates by pressing down on the trigger, which can also be referred to as a button. This button is commonly located on top of the airbrush when it is held upright.
This button / trigger controls air flow. The paint flow is controlled utilizing and knob typically located at the rear of the airbrush (on most modern designs). This knob controls the positioning of the needle inside the airbrush. The needle is used to control the amount of paint delivery at a given moment.
The farther inward the knob is turned the less paint delivery you get, yet the farther outward the knob is turned the more paint you will get. By simply turning the knob outwards on a single action airbrush you are essentially pulling the needle farther back inside the airbrush to which opens up the nozzle and allows a greater amount of paint flow.
The opposite is also true, the farther inward the knob is turned, the farther forward the needle goes, and the more closed off the nozzle becomes (lessening the paint flow).
Simply speaking, the single action airbrush utilizes the button / trigger on top of the airbrush for air delivery, and the knob (commonly located at the tail end of the airbrush) for paint
This design works great for achieving complete, and even paint coverage. However, it does have its disadvantages when it comes to detail work. As it can be very difficult to achieve specific patterns with a single action airbrush. Patterns to which the double action airbrush excels at.
For more information on the single action airbrush be sure to check out my latest post on the topic, where we dig deep into the workings behind the single action airbrush, as well as the major advantages and disadvantages of single action. That article can be found Here under single action airbrush.
The Double Action Airbrush

Now, the double action airbrush is commonly seen as a step up from the single action airbrush.
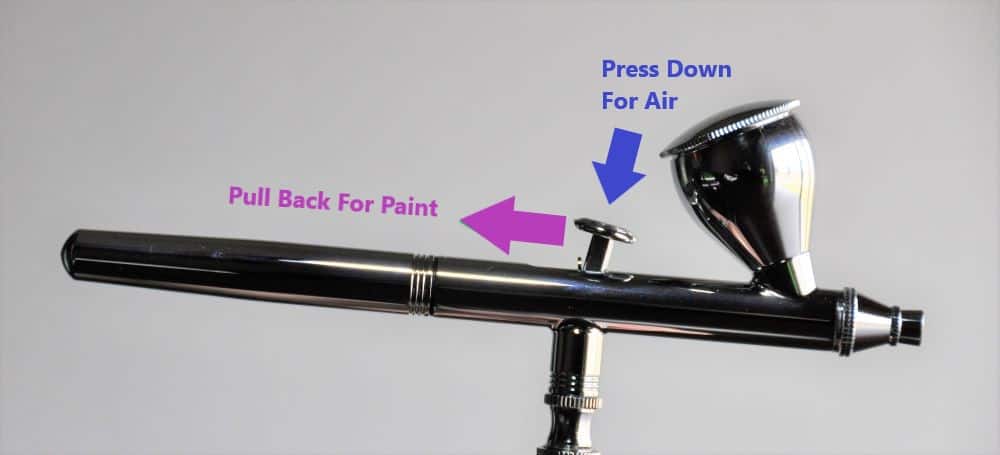
The term double action, similar to the single action refers to the trigger mechanism to which controls both air and paint flow. The double action airbrush, utilizes a downward pressure on the trigger similar to that of a button in order to control air flow.
This button like mechanism is similar to what is commonly seen on the single action airbrush. However, the double action airbrush also utilizes a backward motion of the trigger to which controls the amount of paint flow from the airbrush.
This means, the double action airbrush allows the user to control both air and paint delivery all simultaneously. This commonly allows for better control over the airbrush, and in turn, a better final product.
Think of it like this, downward pressure on the airbrush trigger delivers airflow. While a backward pull of the trigger delivers paint, and the farther back you pull the trigger the higher the quantity of paint that will be delivered.
It’s common for an airbrush artist to require little paint delivery when airbrushing fine detail. But when it comes to creating gradients and/or shading, it is typical for an airbrush artist to work at a greater distance from the canvas then if they were working on fine detail, but when working at a further distance from the canvas, it is common for an airbrush artist to require a greater quantity of paint delivery.
Well, when it comes to the double action airbrush, this change in distance can be done in literally milliseconds. As you simply adjust the positioning of the trigger. Whereas on the single action airbrush, you will be required to adjust the needle knob in order to compensate for the change in paint requirement.
Now that you have a basic understanding as to why the single action and double action airbrush are called as such. Let’s dive a little deeper into the major differences between the two!
The Differences Between Single Action & Double Action
The major difference between a single action airbrush and the double action airbrush a simply how the needle is controlled inside the airbrush. The double action airbrush allows the user to control the needle position via the trigger. Whereas the single action airbrush requires the user to use an adjustment knob (commonly located at the tail end of the airbrush) to adjust the needle position.
If you don’t know at this point,
The needle inside the airbrush is basically what controls the amount of paint that is delivered based on the needle position. The farther the needle is inside the nozzle the more closed off the nozzle is which in turn provides less paint delivery. Whereas the farther out/back the needle is positioned, the more open the nozzle is, which results in a greater amount of paint delivery.
Speaking in terms of the double action airbrush, allowing the user to control the needle position via the trigger position allows for a greater amount of control and usability when it comes to achieving specific patterns and illusions.
This is due to the user’s ability to adjust the needle position simultaneously as they work. Whereas the single action airbrush does not allow this to be achieved in any sort of simple manner. In order to achieve the same effect using a single action airbrush the user would be required to adjust the needle positioning knob simultaneously as they spray a line of paint. This can be both difficult from a stability standpoint, as well as an accuracy standpoint.
Now keep in mind, this does not mean the single action airbrush is not worthwhile considering, that is, if you are in the market for an airbrush. You see, single action airbrush allows for better control of the amount of paint delivery based on a coverage perspective. This means if you are say, looking for a tool that will achieve even and consistent paint coverage such as what you would see when using a paint can.
The single action airbrush could definitely be a good option for you, if you intend on using the airbrush for paint coverage rather then fine detail
We will discuss more on the ideal tasks and uses of single action and double action airbrush later on down this page but for now the takeaway is: the single action airbrush excels at overall even paint coverage, while the double action airbrush excels at fine detail work.
Where The Single Action Airbrush Shines
The single action airbrush is awesome when it comes to painting full coverage. Such as when painting pieces such as rc bodies, model cars, trucks and so forth… It’s common to see a single action airbrush used for tasks such as listed above.
However, the single action airbrush struggles when it comes to painting portraits and murals that require a high level of detail in order to achieve desired specs. Simply speaking, if your looking to paint photo realistic images of any kind, using a single action airbrush is likely going to prove to be difficult.
Where The Double Action Airbrush Shines
Now the double action excels at really almost anything that the single action does. The thing about the double action is that it’s more difficult to master than that of the single action. However once mastered the double action can prove to be much more useful in a larger variety of scenarios than that of the single action.
Ideal uses for the double action airbrush include very fine detail work such as when painting pictures and artistic realism. The reason why the double action airbrush is so useful when it comes to painting high detail pieces, is that it allows the user to adjust the amount of paint delivery mid stroke.
This essentially means that you can go from spraying a thin light line to spraying a thick dark line all in one stroke. This means that more specific patterns can be achieved in order to portray a hyper realistic image.
To be specific, if you have ever heard of the dagger stroke, and possibly the workings behind making a dagger stroke. Then you likely know that paint delivery starts off light and gets thick or the opposite in order to achieve such an effect.
Without the double action and capability of a dual action airbrush, the dagger stroke becomes very difficult to achieve.
The dagger stroke is simply one example of the many different patterns that can be achieved utilizing a double action airbrush, to which otherwise can prove to be very difficult to achieve when using a single action airbrush.
So if you have intentions of painting hyper realistic images, or really have a desire to create any sort of artistic phenomenon by using shadows, highlights, gradients and so forth… Then odds are a double action (dual action) airbrush will likely suit you best.
Keep in mind though, that a double action airbrush can essentially do the exact same tasks as a single action airbrush. The major difference between the two is the fact that the double action airbrush can achieve a greater amount of different tasks than that of the single action airbrush.
Why The Double Action Airbrush Is Commonly Preferred Over Single Action
Most in the airbrush industry prefer the double action airbrush over the single action airbrush, simply because the double action airbrush allows the user a greater amount of control and usability than that of the single action airbrush.
Me personally, I prefer the double action airbrush simply because my style requires the use of fine detail work and specific patterns to which cannot be, or are very difficult to achieve when using a single action airbrush.
Plus, if you get on YouTube and simply do a search for “airbrush” odds are most of the results they come up will be demonstrating the use of a double action airbrush. I cannot tell you how many videos I’ve watched on the topic of airbrushing, and if I could put a percentage on how much I see a double action airbrush as opposed to a single action airbrush it would likely be something along the lines of this:
I see a double action airbrush being used 85% of the time, as opposed to the single action airbrush I see being used only 15% of the time… And when I do see the single action airbrush being used, it is commonly being used to paint color coverage (paint a large surface one color) rather than any detail, such as how you would see a base coat laid down.
Simply speaking, the double action airbrush commonly allows the user a greater amount of usability out of the airbrush. Whereas the single action airbrush, though it cannot keep up with a double action airbrush in terms of detail work. It excels in paint coverage, similarly to how you would use a spray paint can.
If you’re looking for an airbrush ideal for your intended tasks, then look no further then my number 1 airbrush recommendation! I have personally scoured the internet for all the different airbrush options, and have come across a few that I personally have found to be excellent options!
- Here is a link to my #1 recommended double action airbrush!
- Here’s a Link to my recommended single action airbrush!
Conclusion
In final, both the single action and double action airbrush has their role to play when it comes to airbrush work. But depending on the task at hand one is likely to be better suited for the task than the other.
If you have intentions of simply spraying paint for coverage such as just like you would with a spray paint can? Then odds are a single action airbrush will be great for your needs.
However, if you have intentions of creating a heavy amount of artistic design, and possibly hyper realistic art and so forth. Then the double action airbrush is likely going to prove to be much more useful.
Granted the double action airbrush is more difficult to master, in the end it proves to be much more useful than that of the single action airbrush. At least in terms of tasks to which it can handle, and styles of painting which can be achieved.
As we discussed above the major difference between the single action and double action airbrush is that the single action airbrush utilizes only one action to which controls the airflow, in order to control paint flow you must utilize the knob to which is commonly located at the tail end of the airbrush.
Now the double action airbrush, allows the user to control both paint and airflow the other trigger located on top of the airbrush. For airflow you simply press down on the trigger, for paint flow you simply pull back on the trigger.
The farther back on the trigger you pull the more paint is going to be discharged from the airbrush.
The double action airbrush allows the user a greater amount of control over how they’re pieces put together, while the single action airbrush allows the user to achieve even and consistent coverage while maintaining simplicity. However it cannot achieve the same number of tasks to which the double action airbrush can.
Anyway, I hope you were able to find some value here! If you have any further questions regarding the airbrush do be sure to take a look around the website. Airbrush Insider is dedicated to helping all in the airbrush community!
This is Colt signing off!
Check Out Some Of My Favorite Airbrush Equipment:
